Configure FSLogix
We will configure the FSLogix on Domain Level in this step.
In this step, you will:
- Configure Profile datadisk & Profile share on the DC
- Install & configure FSLogix GPO’s on the DC
Configure Profile datadisk & Profile share on the DC
-
Sign in on the Azure Portal with your credentials.
-
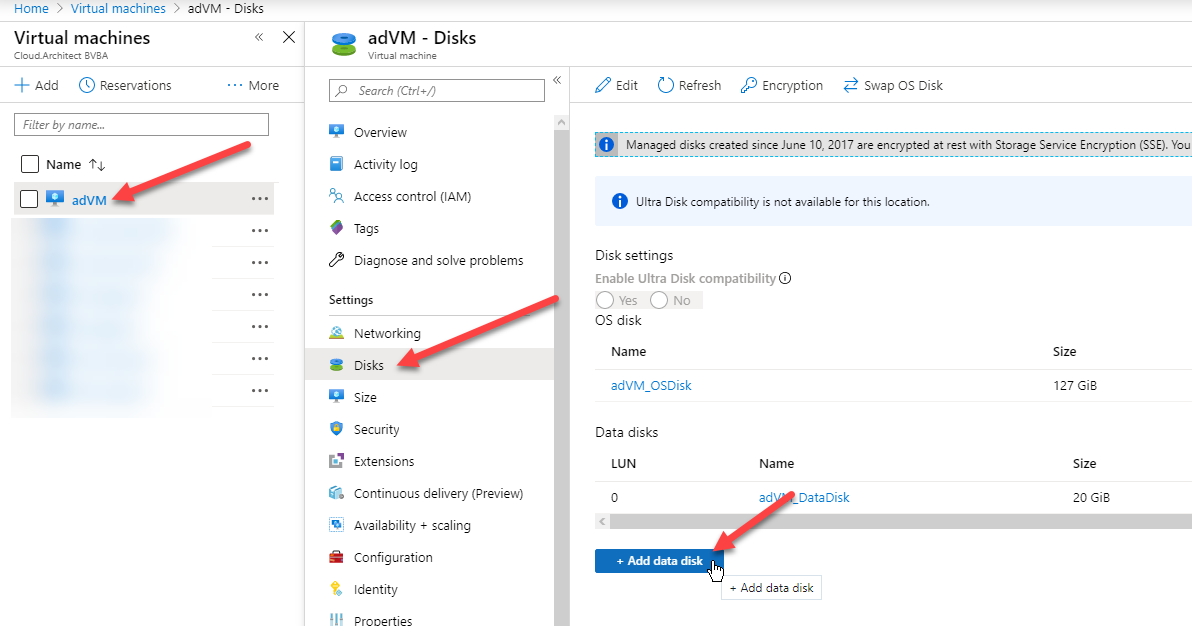
Go to Virtual Machines, select adVM, select Disks & click on + Add data disk
-
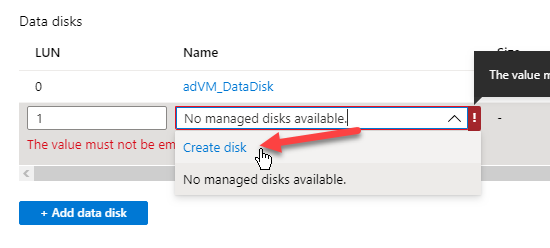
In the dropdown, select Create disk
-
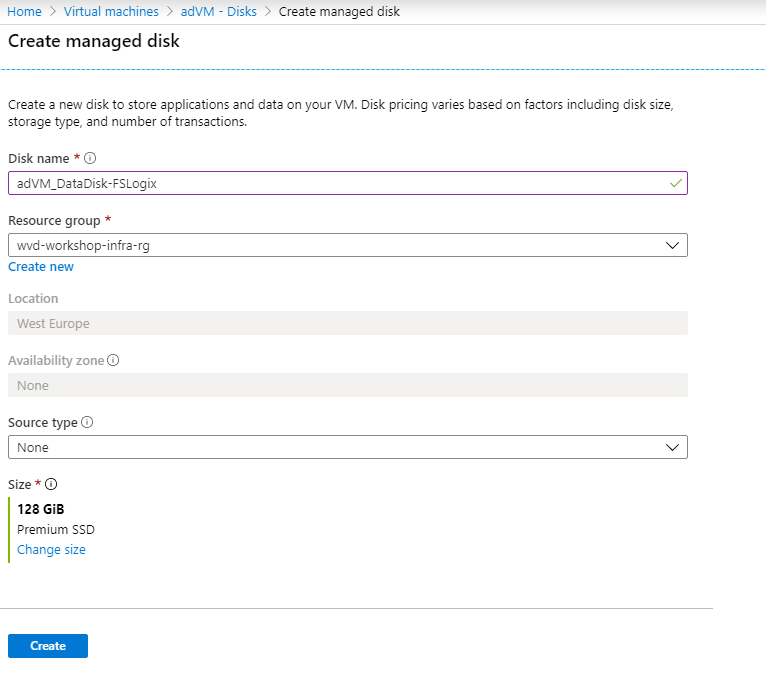
Enter adVM_DataDisk-FSLogix as diskname, change the size to 128GB Premium SSD & click on Create
-
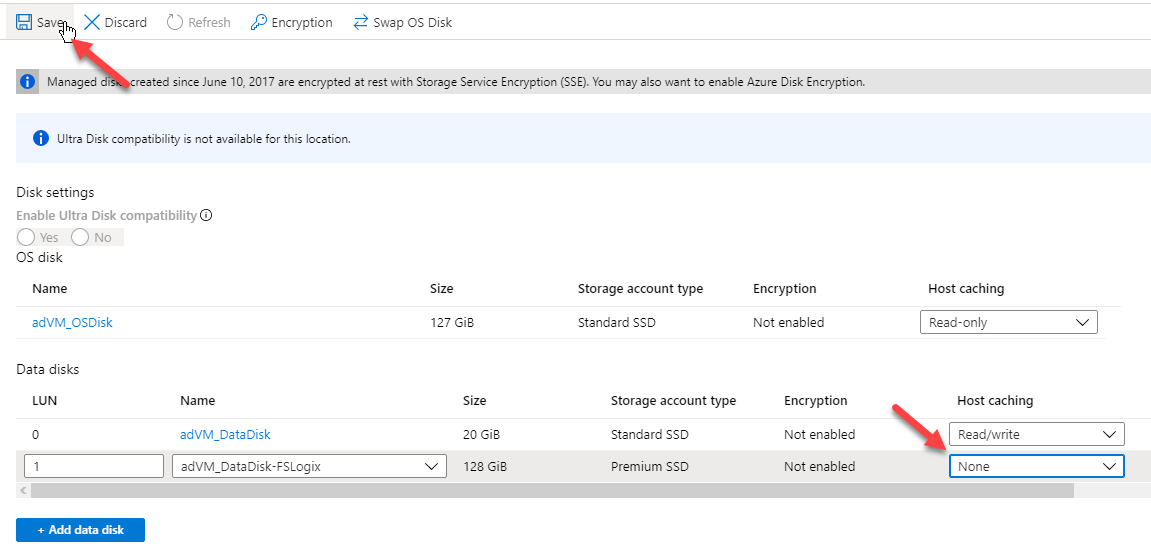
Change the Host Caching to None and click on Save
-
RDP to your DC (See Step 2 how to connect)
-
Open a Run box (Windows-Key + r), type in diskmgmt.msc and hit Enter
-
The Disk Management will popup a Initialize Disk window.
Keep the default settings (MBR) and Click OK -
Right-Click the Unallocated volume and click on New simple volume
- Go through the wizard:
- Keep Maximum Size available
- Change drive letter to P (profiles)
- Change File System to ReFS
- Change Allocation Size to 64K
- Change Volume Label to Profiles
- Make sure Quick Format is enabled
- Click Finish at the end
-
Create a new folder on the P-drive: FSLogix-Profiles
- Change permissions on the folder to this Best Practice from FSLogix:
| User Account | Folder | Permissions |
|---|---|---|
| Users | This Folder Only | Modify |
| Creator/Owner | Subfolders and Files Only | Modify |
| Administrators | This Folder, Subfolders, and files | Full Control |
| Domain Admins | This Folder, Subfolders, and files | Full Control |
- Share the folder to all Domain Users using this Powershell cmdlet:
New-SmbShare -Name "FSLogix-Profiles$" -Path "P:\FSLogix-Profiles" -FullAccess "Domain Admins" -FolderEnumerationMode AccessBased -ChangeAccess "Domain Users" -CachingMode None
Install & configure FSLogix GPO’s on the DC
- Download the FSLogix installer zipfile (containing the GPO’s)
Extract the zipfile
Copy the policy files to the PolicyDefinitions folder.
This can be done using Powershell:
$url = "https://aka.ms/fslogix_download" $destination = "c:\temp\fslogix.zip" New-Item -Path "c:\" -Name "Temp" -ItemType "directory" -ErrorAction SilentlyContinue Import-Module BitsTransfer Start-BitsTransfer -Source $url -Destination $destination -Priority High Expand-Archive -LiteralPath $destination -DestinationPath c:\temp\fslogix Copy-Item -Path "C:\temp\fslogix\fslogix.admx" -Destination "C:\Windows\PolicyDefinitions\" Copy-Item -Path "C:\temp\fslogix\fslogix.adml" -Destination "C:\Windows\PolicyDefinitions\en-US\" -
Open a Run box (Windows-Key + r), type in gpmc.msc and hit Enter
-
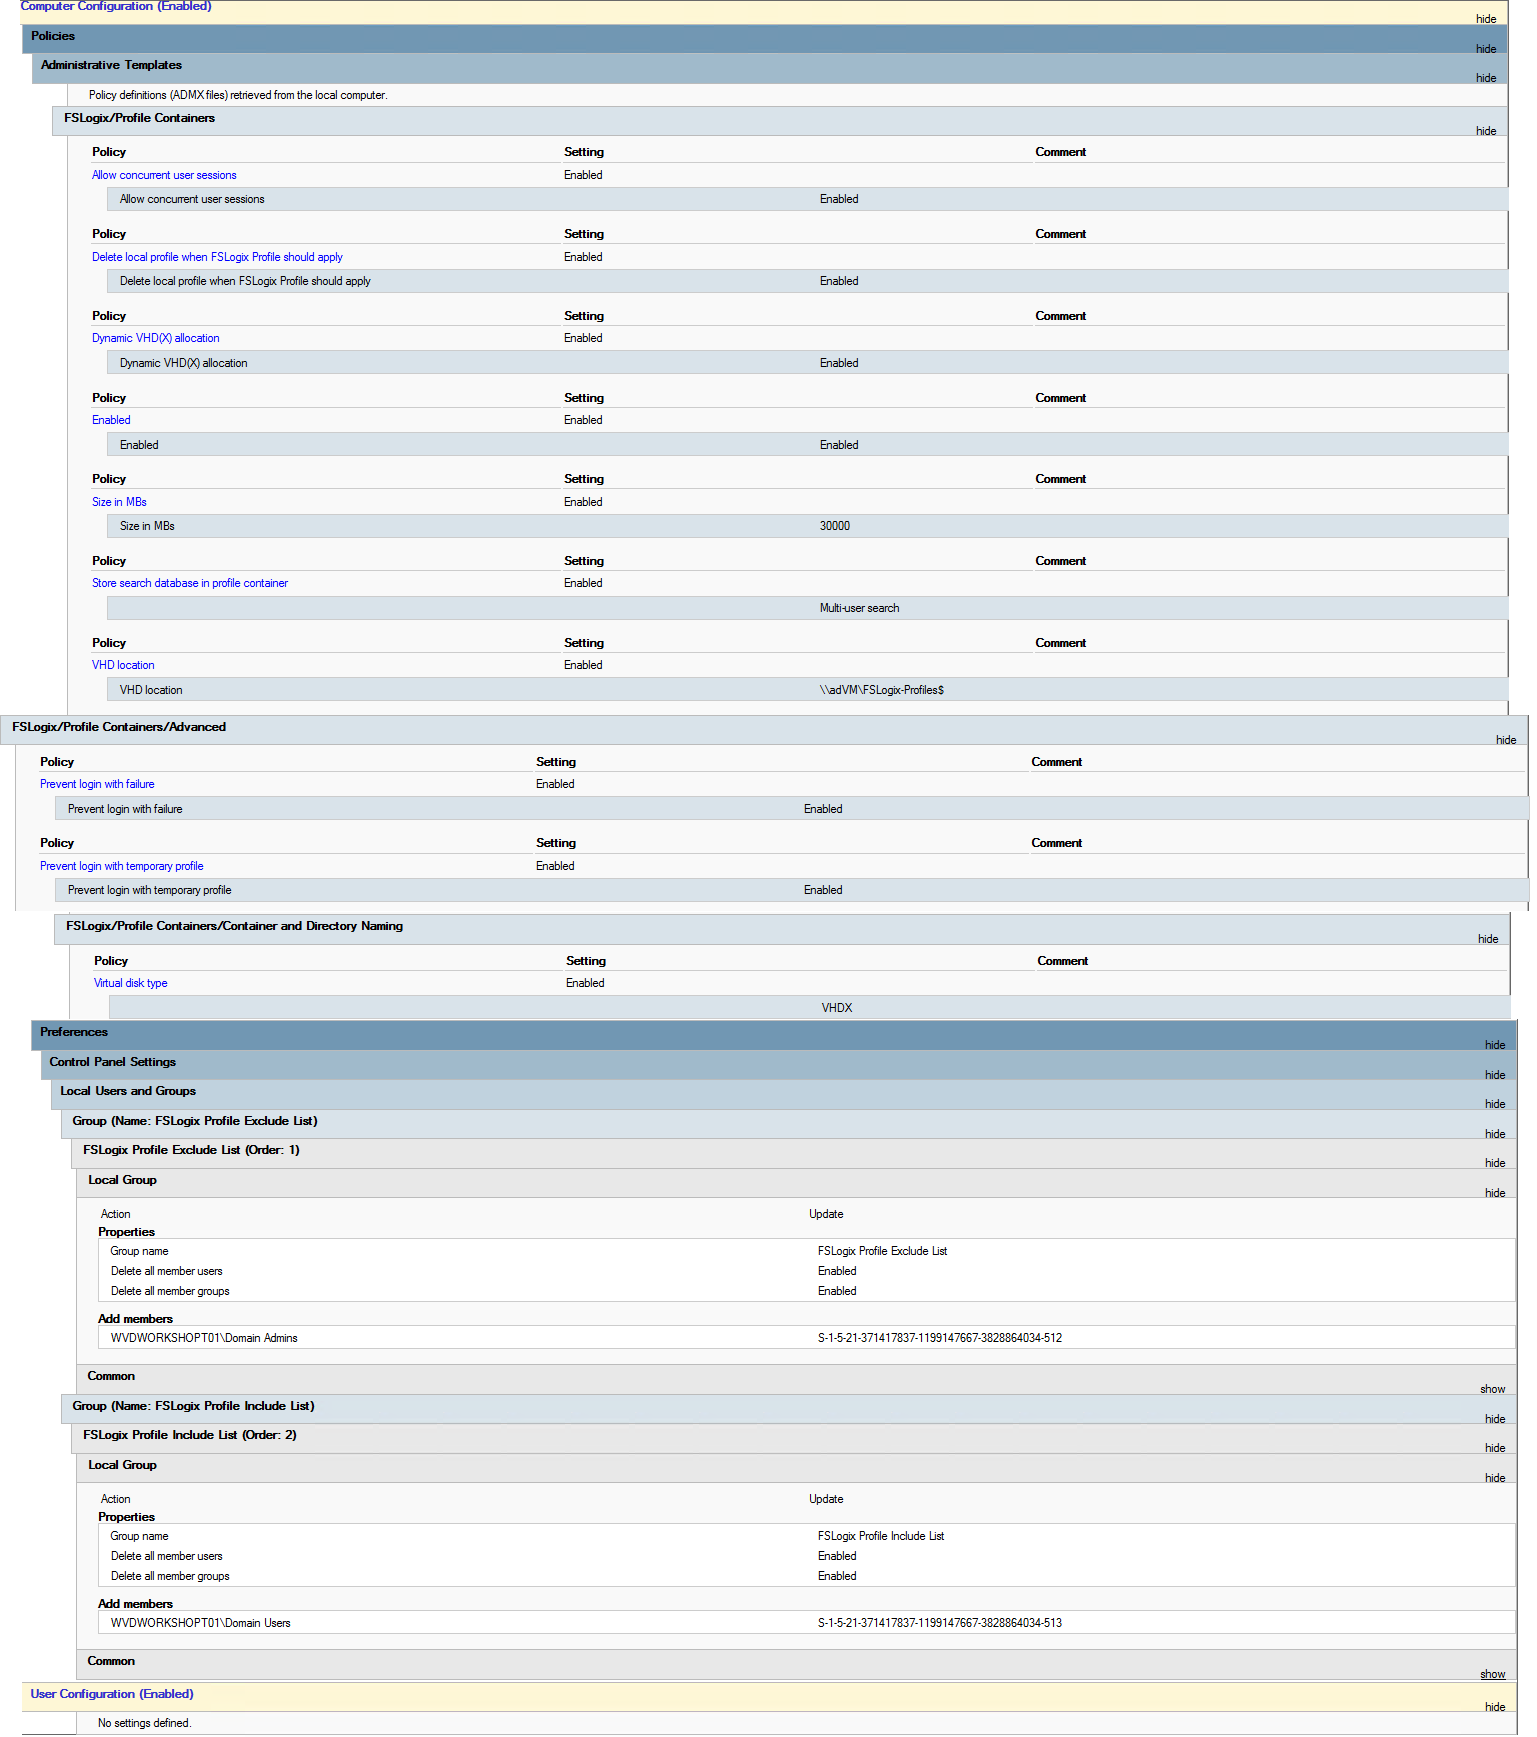
Create a new Policy Object (below Group Policy Objects from your domain) and name it FSLogix - Default Policy.
Apply these settings:
-
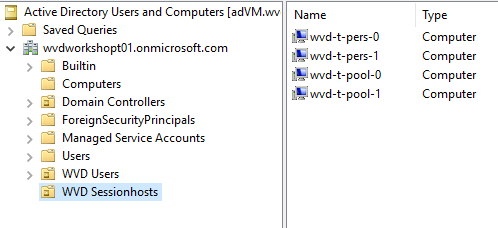
Create a new Organizational Unit named WVD Sessionhosts
Move all Sessionhosts to the new OU
-
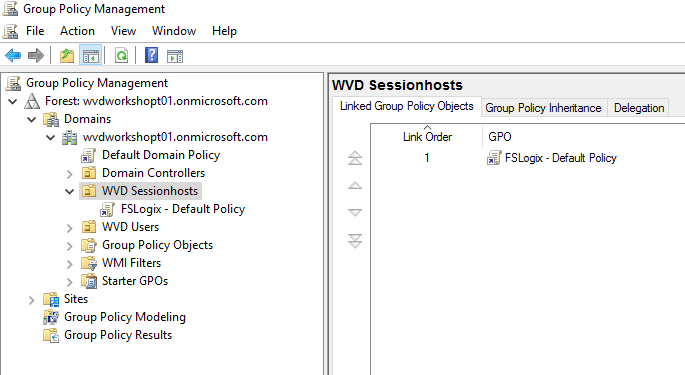
Apply the FSLogix - Default Policy policy to the new OU
- Reboot all WVD servers for the policy to apply.
This can be done using this Powershell oneliner, causing the Windows FW to be disabled (for ping) & reboot server
Get-ADComputer -Filter 'Name -like "wvd-t-*"' | Select-Object DNSHostName | foreach { Invoke-Command -ComputerName $_.DNSHostName -ScriptBlock {Set-NetFirewallProfile -Profile Domain,Public,Private -Enabled False} ; Restart-Computer
-ComputerName  $_.DNSHostName; }
Get-ADComputer -Filter 'Name -like "wvd-p-*"' | Select-Object DNSHostName | foreach { Invoke-Command -ComputerName $_.DNSHostName -ScriptBlock {Set-NetFirewallProfile -Profile Domain,Public,Private -Enabled False} ; Restart-Computer -ComputerName  $_.DNSHostName; }
Tip You can check for the reboot using “ping wvd-t-pool-0 -t”
Test FSLogix Profile containering
-
Start user sessions to the Full Desktop using DemoUser001, 003 & 004 one-by-one.
-
Check on de adVM under the P:\FSLogix-Profiles if you can see folders for each user
Each folder should have a VHDX file for the user.
Also check the Permissions on the folders to verify the permissions -
Check the Sessionhost, under the folder C:\Users.
Each user, connected to that Sessionhost, should have two folders: <Username> & local_<Username>